Monday, June 18, 2012

Lace me up: Hanger Cover

I was laying in bed last night thinking about a craft fair in October (c-r-a-z-y). Which led me to the thought that I don't have any pretty hangers to display the vintage clothes I am putting up for sale. And the hanger cover was born. This is incredibly simple and I plan to try this with other fabrics. The lace is pretty, but it may have a cleaner look with a different fabric (or seamstress...lol)


Materials:


  • Hanger
  • Fabric (Lace)
  • Scissors
  • Sewing machine
Step 1:

Lay out your fabric and cut out an outline of the hanger. Since I used lace I didn't bother tracing, I just taped the hanger down with masking tape and cut around it. 


Step 2:

Repeat step 1

Step 3: 

Take your 2 pieces and sew the "right sides" together around the edges, leaving the bottom open so you can slide the hanger through. 

Once you have the pieces sewn together, flip them inside out so the "right sides" are showing and slip your hanger in. 

Here it is: (Yes, very out of place, but I love the outdoor lighting)


Saturday, June 16, 2012

Green with Envy: End Table Makeover!

This little end table is another proud find from the church rummage sale. Like the sewing stool, it was originally priced at $2, but then marked down to $1. Here is my makeover tutorial, enjoy!

What you need:


  • White spray paint, I recommend Kilz, it is awesome!
  • Painter's tape (I used masking tape from the dollar store, but painting tape will be better)
  • Acrylic Paint (I used apple tart)

Here are the before photos:


Step 1: 

I spray painted the entire table with the white spray paint. 


I let this dry for about an hour, then flipped the table over and spray painted underneath. I then let this dray for another hour.

Step 2:

Let the taping begin! I started taping diagonally from left to right:


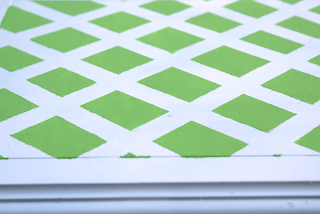
Then I began taping over the current tape diagonally from right to left. This is what I got:


I also taped around the edges for a cleaner look. I only wanted the center of the table painted.

Step 3:

Time to Paint! Make sure your tape is attached tightly! No loose pieces! For paint I used acrylic, Craftsmart in Apple Tart. I began painting the inside of the taped area with a paintbrush. This is the product:


I let this dry for about an hour. You do NOT want to pull off the tape when the paint is wet. 

Step 4:

Ladies and Gentlemen, pull off the tape!


I went around the edges that were smudged with a small brush and some white acrylic paint, just for touch ups. 

Tada!


Here is the before and after shot:


Hope you enjoyed this tutorial. As always, feel free to leave a comment or email me. I love to hear from my blog readers!


Linked up at: Today's Creative Blog

Tuesday, June 12, 2012

Sewing Stool Makeover

Hi Everyone! I found this old sewing stool at a church rummage sale in my neighborhood. Originally priced a $2...then marked down to $1 after 12pm. I was pretty proud of this score!


It is not in bad shape, but could most definitely use a makeover. I'll show you how I completed the stool makeover...keep in mind that I'm still fairly new at this (don't judge me! lol).

What I used:

* Fabric (probably 1.5 yards total, I'm not sure though)
* Acrylic Paint (I used black)
* Staple Gun (oh yeah!)

Optional: Mad present wrapping skills.


Step 1: Take apart the stool and remove all hardware. Shown below:

Hello random pink flip flop...


Step 2: Paint the inside of the stool and any outer hardware. I chose black:


Step 3: Begin the process of wrapping with fabric and stapling with the staple gun. I started with the top of the stool. I wrapped it like a present, making sure none was left uncovered. I folded in the edges and stapled the fabric to the top of the stool. (I tend to get a little staple gun happy...)

Step 4: Continue the wrapping process with the bottom of the stool. I started at the underneath portion and worked my way up. Don't forget to mark where your stool legs need to get screwed back in. You'll need to cut holes here. For my stool, I ran out of polka dot fabric, so I mixed it with the solid yellow. I like the color combo and it's what I had laying around :)


Step 5: Once all of the fabric is stapled in place attach the legs and any hardware. All done!


Just in case you wanted to see a side by side before and after:


I linked this at a party at The Blackberry Vine!

Friday, June 8, 2012

Before and After

Fun with before and after projects!

Pink Heart Shelf

*Black Paint
*Pink Paint
*Crackle Medium
*Vintage Magazine Pictures
*Mod Podge

1. I painted the shelf black.
2. After that dried I applied the crackle medium.
3. I then painted the shelf pink.
4. When that dried I applied the vintage photos with mod podge. 

All Done!


Vintage Photo Inspired Clip Board

For this project, I painted an old clipboard green, mod podged some vintage photos, a quote and magazine clippings, then sprayed on a glaze. Easy as pie! :)


Small Wooden Trinket Box

Found this box at a thrift store for a steal!

*Paint
*Vintage Magazine Clips and Photos
*Mod Podge
*Glaze

First I put a rough coat of green paint on the box. I wanted it to have a worn look. Once that was dry, I mod podged my vintage clips onto the inside of the box. Sprayed with glaze and finished!


Mail Organizer/Cork Board

I found this memo board at Salvation Army. It was a good find, but needed some help!

*Paint (I used Bahama blue)
*Fabric
*Staple Gun
*Glaze

First I painted the front and the back of the memo board with Bahama blue. Next I used the staple gun to attached my fabric to the cork section of the board. Then I sprayed a glaze over the painted section. There you have it!


Find this post at Today's Creative Blog as part of the link party!

Wall Art

Here are two of my latest wall art creations. These were inspires my 2 pieces of shelving wood I rescued.


Inspire Art

*Coated the entire shelving board with mod podge
*Attached lace in a rainbow color pattern
*Printed out the word "inspire" (this has had a lot of meaning for me lately)
*More mod podge to seal everything in.
*Attach a hook to the back of the shelving board and it's ready to hang!


You are my happy art:

I thought this saying was so adorable the first time I heard it. I knew it would be incorporated into a project! 

This used another piece of the rescued shelving board.

*Scrapbook Paper
*Quote
*Mod Podge
*Glaze


  • Cut strips of paper the size of the shelving board. I used 2 patterns and alternated  them.
  • Cut out letters from quote if needed.
  • Cover board with mod podge and attach paper background and quote
  • Mod Podge over the paper and quote
  • Spray with a glaze


LinkWithin

Related Posts Plugin for WordPress, Blogger...