Thursday, November 29, 2012

Bye Bye November: Mini Giveaway!

Hi Everyone! Hope you all had a great month! Please enter to win this Vintage Inspired Necklace from Michelle's Pixie Dust. I will mail it on Monday, plenty of time before Christmas!


a Rafflecopter giveaway

Wednesday, November 28, 2012

Owl Be Home For Christmas


I have definitely hopped on the owl band wagon! I thought of this idea on my drive home today and put it into action. It's super simple, hope you love it!

Supplies:

Scrapbook paper
Stencils
Permanent Marker
Mod Podge
Board, Canvas or Paper


  • Cut the scrapbook paper in small squares
  • Modge Podge the squares to your board, canvas or paper
  • Stencil out "Owl Be Home For Christmas" with your permanent marker
  • Mod Podge that piece of paper on top of your squares.
  • Cut out your owl on solid color paper. I used the method of folding the paper in half so everything would be symmetrical
  • Mod Podge your owl on the board, add some eyeballs and you're done!

I love my little owl!


Monday, November 26, 2012

Social Stack Up Blog Hop #3

The blog hop is back for it's third week! Link up and share with your friends. Hope everyone had an amazing Thanksgiving!


Michelle's Pixie Dust


Social Stack Up Rules:

1. Please follow me and the amazing co-hosts via GFC, Facebook, Twitter or other social network.
2. Grab a Social Stack Up button to display somewhere on your page
3. Share this hop with your friends! The more people who know about the hop, the more friends we can all make.


Host: 

Michelle @ Michelle's Pixie Dust
Co-Hosts:

Lisette @ Northern Belle Diaries
Heather @ The Mosby's In China

My Grandpa's Writing About Family


As most of you have noticed, I designed a new header yesterday. What most of you probably don't know, is that the pictures on my header are all from my grandparents basement. I'm always fascinated by the look of old things and even more fascinated by old things that belong in my family.

The best thing I found was a writing from one of my grandpa's school books. It was for a Civics class. The writing assignment was about family. Here is just a bit of what he wrote:

"An ideal home is a place where one can enjoy himself after a hard days work. A home where love always exists between husband and wife and family. A place where one who has troubles can go to mend them. A place where kindness always exists."

My grandpa passed away a few years ago. He never got to meet my husband. I know he would have really liked him.

My grandpa always had a very strong work ethic and definitely passed this on to my father. I have the very best father ever. If anyone wants to have a competition, bring it. :) I can see where my father learned about the importance of family, which he exampled for my sisters, my brother and myself. In a way, this statement by my grandpa defines my family.

I grew up in a home where my father was very hardworking. I grew up in a home where my dad undoubtedly loved my mother and all of us kids. I grew up in a home where we did mend our troubles and the troubles of others. I can't tell you how many times I remember other family or friends coming over to talk with my parents about a problem. I grew up in a home where there was always kindness. We had our moments, but my parents never put us down or discouraged us kids (or each other) in any way.

It's so interesting how the values of one generation are passed down to the next. My grandpa and I were very different people, from our political and societal views to our personalities. After reading what he wrote, I know that despite our differences, we had one very important thing in common: our views on family. I only wish other families could be as lucky as mine.

I will keep posting about the pictures in my header and the things I find in my grandparents basement. I hope you all have a wonderful evening.


Sunday, November 25, 2012

Holiday Gift Idea: Home Made Laundry Detergent


With the holidays coming up, everyone is looking for gift ideas. The DIY craze has hit full force, and why wouldn't it? It's tough economic times, and the perfect opportunity for individuals to get creative. With this recipe for home made laundry detergent, you can make at least four gifts, all for under $20! There is room to make more than four, depending on how big your canning jars are. There is also room for this to cost less, depending on the brand of the ingredients purchased. Even for personal use, this recipe yields approximately 80 loads for $20. Sounds good to me!

This is a great idea for teachers, your postal worker, coaches or gift exchanges.  I haven't met a person who doesn't wash their clothes :)


Home Made Laundry Detergent {more bang for your buck}
2 Tablespoons per load, 20 loads per jar


Ingredients:

8 Cups Powder Detergent (All $7.00)
1.5 Cups Powder Stain Remover (Oxiclean $5.00)
1 Cup Fabric Softener Crystals (Downy Lush $6.00)
1/2 Cup of Baking Soda ($1.00)
2 Bars of Anti-Bacterial Soap ($2.00)

Supplies:

Canning Jars (I used 1 quart and made 4 jars full)
Cheese Grater
Mixing Bowl
Measuring Cup


** I made half of the recipe at a time in a large mixing bowl, it was definitely easier to manage.

Step 1:

Grate the soap. Using your cheese grater, grate the bar of soap into your mixing bowl.


Step 2: 

Add the powdered detergent, powdered stain lifer, baking soda and fabric softener crystals. Mix each ingredient as added with a large spoon.


Step 3:

Pour the mix in your canning jars. If you are using 1 quart like I did, just fill them to the top. If using a different size, you may want to measure that out in tablespoons.


To finish them off, stick a label on each jar. Make sure to include the instructions: 

2 Tablespoons = 1 load of laundry.

I hope your friends and family love this gift!


Saturday, November 24, 2012

DIY Holiday Wreath with Dollar Tree Items!


I have yet to meet a person who doesn't like the dollar store. I knew when I went there tonight I would be looking for supplies to make a wreath. I have seen countless wreaths on Pinterest and wanted to make one of my own. I surprisingly had a hard time finding what I needed, so I definitely got creative. Here's how I made my wreath, enjoy!

Materials:

From the Dollar Tree:

Splatter Screen
2 tubes of small ornaments
Silver spiral branches
Ribbon
Small Clipboard
Door Hanger for wreath

From my stash:

Green paint
Black Paint
Scrap tulle and lace from yard sales


The first thing I did was paint the clipboard on the back side. I used the green paint for this. 


Then I painted our name on the clipboard with the black paint. Another idea I had was to use letter stickers. 


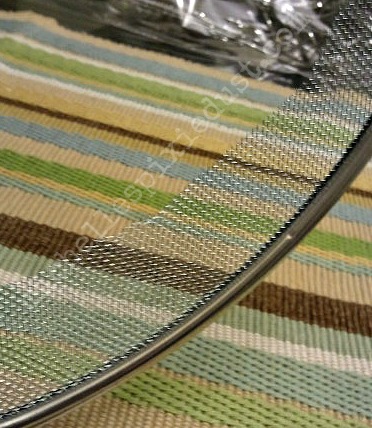
I swore I have seen foam wreaths at the Dollar Tree before. So either they were out, or I'm just crazy. This is where I needed to improvise. I ended up buying a splatter screen from the cooking isle. 


I took some scissors and cut the center out, leaving about 2 inches around the edge. Regular Scissors worked fine for this. CAUTION: The wire is sharp! Be careful throughout the rest of the project.


To fill out the wreath, I used some tulle and lace I had stashed from yard sales. As you can see, the old tulle was only 25 cents.


To begin filling out the wreath, I cut the lace and tulle into strips about 2 inches wide and 8 inches long. There was no exact measuring going on here, but I know it helps to give an estimate. I tied the strips in knots all along the wreath body. 


I just kept cutting and tying until I thought it looked full enough.


Next I inserted the silver branches behind the knots I made with lace and tulle. I cut the branches down to right below the curl at the end. I left just enough room to insert the end of the branch and have the curl sticking out of the side. 


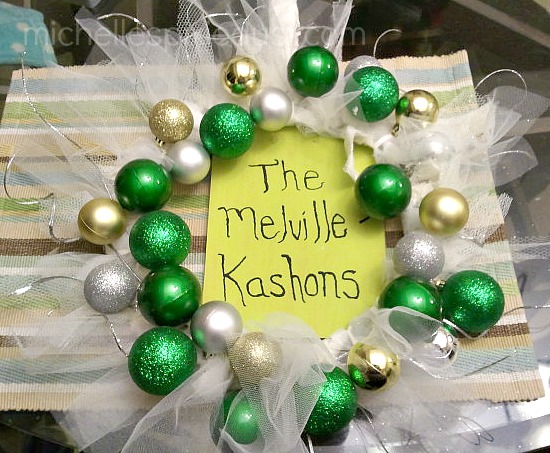
After that, I began to tie on the ornaments. The green ones were larger than the silver and gold, so I tied those on first and distributed them evenly. I cut about 6 inch pieces of ribbon, threaded them through the top of the ornament and tied them onto the wreath. I followed the same process with the smaller silver and gold ornaments.


To finish off the wreath, I wrapped the handle with lace and tied some tulle into a loop and bow through the handle. 

Then I tied ribbon through the back (really the front) aka non-colored side of the clipboard, using the clip as a hanger. I then tied that ribbon to the top of the wreath, so the clipboard hangs behind the wreath. Here is the finished product:


Here's what the wreath looks like on the door:


Overall, this was a really fun and easy project. Not to mention CHEAP! I only spent $7 at Dollar Tree. It's nice to have a wreath with a personal touch. 


Friday, November 23, 2012

Celebrating a Birthday with the Coolest Guy Alive


Today is my son's birthday. I post about him a lot, so I thought he should get a special birthday post :)

A little about the two of us...

I had my son when I was 14 years old. I know, WOW. The two of us are tight, we have literally been two peas in a pod (aka apartments and condos) until I met Nathan two years ago. Now we are five peas in a pod...including the Chiweenies. Jasen's dad died in 2006 when Jasen was five, but hat's another story for another day.

Jasen is truly the most amazing kid in the world. I know every mother thinks that about their son, but I know mine is meant for great things. I can see him being president or a famous humanitarian.

So on to our day of fun!

First we took a picture of Jasen before bed last night, just so we can compare what he looks like at age 11 vs age 12.


Then this morning I took a picture of him at age 12. You can obviously see the difference.


He asked me to make him a birthday shirt {one of the fun things about having a crafty mama}


Then we went on an adventure to get him the best surprise birthday present ever: an iPhone 4s!


We have taken a trip to Target, got some Subway for lunch and now we are watching Spongebob. And Jasen is editing my post about him. He doesn't like it when I write about him, lol. 

If we're lucky, we might be able to go to Red Lobster tonight for a birthday dinner!

Thanks for not Killing Anyone

I was very stressed out the other night. My husband must have heard the unusual amount of tension in my voice, because on his way home from work he stopped and bought these "thanks for not killing anyone" flowers. 

One of the many reasons I love my husband. 

He always tricks me whenever he brings home flowers or a gift. This time he told me someone keyed my car and I needed to come look at it. On the hood of the car was a card and the flowers. Inside the card he thanked me for not killing anyone. 

He's crazy and that's another reason why I love him.


Monday, November 19, 2012

Where have I been?

I usually ask myself that on a daily basis. I haven't blogged in 12 days and it feels like an eternity! There have been lots of things going on in my life, most of them great, some of them not so great. I'll share them with you.


In my last post, I discussed how I had been facilitating grief and loss groups at work. Since that post the students I work with have endured the loss of more classmates. Out of these tragedies I have seen the students and the community pull together and show great compassion for one another. These are pieces of art the students created during a group session. We discussed how we are all very different, but can come together as one and be incredible. 


On another note, I have been busy crafting. I created this mail holder which will hopefully be sold at the Rock and Roll Craft Show this weekend. My sister added the sparkles and bow (she's also crafty like that).


I have also been busy knitting. I haven't posted about this yet, but hopefully I will get to share more of my projects with you all. Here are some of the things I made for the upcoming craft show.


I hope to be back blogging on a regular basis. I miss you all! :)


Wednesday, November 7, 2012

Pencils in the Ceiling


One of the more interesting parts of my day was running a grief and loss group with teenage boys. Through all of their craziness and inappropriate comments (can you bring us pizza and strippers next group session?)...they remind me why I do what I do.

Today we discussed the stages of grief and how each one applied to them. We discussed how they are coping with the recent deaths of very young friends. We talked about why smoking weed might not be the best coping skill to deal with grief. This lead to a long discussion of why marijuana should be legal and taxed and the politics...on...and on...

Throughout group I had an older student throwing pencils in the ceiling the whole time. He freshly sharpened every pencil he could find and threw it  into the Styrofoam ceiling panel  I should have stopped him, I know, but it was entertaining and he was participating in the discussion, so I let it ride.

I can make you a laundry list of why I want to quit my job and be a full time blogger. The joys of working in pajamas some days, 10am yoga classes and morning coffee at Starbucks are quite appealing.

But then that student who throws pencils in the ceiling tells you that he is not planning on coming to school Friday. I told him we are going to have another group session this Friday and he is welcome to attend again. He changes his mind and tells me he will come to school if we are having group.

I get the "ohhh that's why I do this" moment.

Then I am asked to make sure I bring some "hot chicks" with me next time I run group.

Who knows what I will do with the rest of my life. But for now, I am very thankful for these small moments that show me I might be making a tiny difference in someone's life.

Pin It, Tweet It, Like It, Love It!

This is a collection of the wonderful links I have found with instructions on how to add these nifty little buttons to every post...


For the "Pin It" button:

http://www.mybloggertricks.com/2012/04/add-pinterest-it-counter-button-to.html

For the "Tweet" button:

http://www.bloggersentral.com/2010/11/add-twitter-tweet-button-to-blogger.html


For the Facebook "Like" button:

http://www.simplebloggertutorials.com/2010/05/how-to-add-facebook-like-button-in.html


If you want to align all of these buttons with a single code, look at the code on this page:

http://www.bloggersentral.com/2012/01/aligning-google-1-twitter-and-facebook.html

I hope these links are useful!

Tuesday, November 6, 2012

Bubble Pizza and Italian Chicken

"I hear you taking pictures...does that mean dinner is ready?" ~My Husband

Oh the life of a man who is married to a blogger. I am so incredibly lucky that he supports me in everything I do!

Monday night was Bubble Up Pizza from Plain Chicken. This was great! It will definitely go into the "quick, easy and yummy" food bank. The total prep time is like 5 minutes and my husband asked me to cook this every night for the rest of our lives. It was a crowd pleaser.


Tonight I made the Italian Chicken Casserole from Tasty Kitchen. It was good, but definitely needed more seasonings. I was expecting a much fuller flavor. I loved every ingredient in this recipe, I just felt like it was missing something. My husband agreed. He added some Italian seasoning and garlic powder. I added some salt. 


LinkWithin

Related Posts Plugin for WordPress, Blogger...