Showing posts with label Craft. Show all posts

Tuesday, March 26, 2013

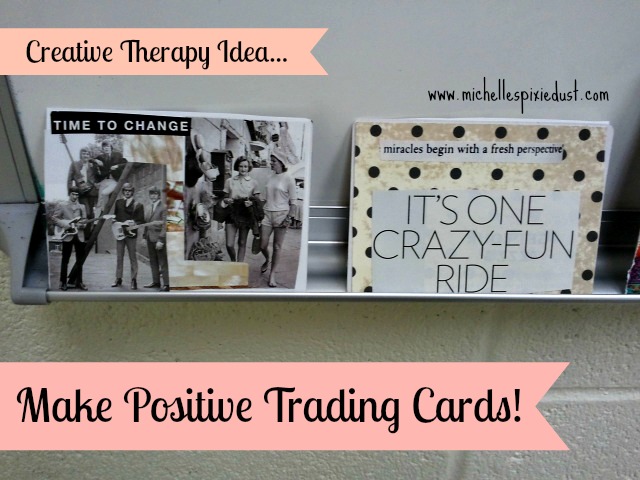
Positive Trading Cards! {Creative Therapy Idea}


This project was SO fun, my girls in my 8th grade group begged me to do it again. They loved using all of the different art supplies and getting to be creative. I even had one student ask me if I got paid to do this. I loved that comment :)

Positive Trading Cards:

The purpose of this activity is to increase positive thinking among students. 

Supplies:

A deck of playing cards (I bought mine at Dollar Tree)
Various Art Supplies:
          Scrapbook paper, paints, old magazines, scissors, glue, sparkles (whatever you can find!)

Directions:

I told the girls we would be making positive trading cards. The only guideline was that they needed to create something positive on the cards, it could be a positive quality or something that inspires them. I asked them to make cards for themselves and at least one to give to another person. 

I gave the girls a few playing cards and told them they could make them over however they would like. I found that using glue sticks and scrap book paper did work best. The painting was a little challenging with the texture of the cards.

One thing I loved about this activity was the time we spent talking while they were creating their cards. It was an open, informal dialogue and I got to know a lot about the girls. We turned on music, talked and had fun creating pretty things. 

This lasted 2 group sessions. I asked the girls to present their cards at the end of the last session. 

Photos!


This activity was inspired by something I found on Pinterest, here is the link!


Friday, January 18, 2013

Valentine's School Activity

I want to share an activity I did today with the 8th graders at one of the schools I work at. I try to do themed lunch activities once a month, this one is a Valentine's Day theme.

This one is called "I don't use drugs because I love..."

I prepared the poster board with the writing and stickers.

I provided students with ink pads for them to make thumbprint hearts.

I asked each student to write something they love that keeps them from using drugs.

I like these kinds of activities because it gets the kids thinking about the most important things and people in their lives. I do believe that kids need to be reminded of these things and people frequently. It is my hope that the kids think of the people they love, things they love and activities they love when the opportunity to use drugs presents itself (and for most kids, the opportunity to use drugs will happen more than once).


Thursday, January 3, 2013

2012: My Favorite Projects!


Hey All! I decided to create my own link up of my favorite creations from 2012. Hope you enjoy!


Monday, December 3, 2012

Funky Knit Bracelet


I am a beginner knitter for sure! I like to play around with colors and stitches. Here is a little project I worked on tonight.

Funky Knit Bracelet

Size 8 knitting needles
Black yarn
Pink yarn

Cast on 7 stitches in pink
Knit 2 rows in pink
Tie on black yarn, knit 2 rows
Switch to pink, knit 1, purl 5, knit 1(do this for 2 rows)
Switch to black, knit 1, purl 5, knit 1 (do this for 2 rows)
Continue switching until your length is about 6 inches
Knit 2 rows in pink
Bind off stitches
Use tapestry needle to weave ends together to form your bracelet

Enjoy the pics!


Wednesday, November 28, 2012

Owl Be Home For Christmas


I have definitely hopped on the owl band wagon! I thought of this idea on my drive home today and put it into action. It's super simple, hope you love it!

Supplies:

Scrapbook paper
Stencils
Permanent Marker
Mod Podge
Board, Canvas or Paper


  • Cut the scrapbook paper in small squares
  • Modge Podge the squares to your board, canvas or paper
  • Stencil out "Owl Be Home For Christmas" with your permanent marker
  • Mod Podge that piece of paper on top of your squares.
  • Cut out your owl on solid color paper. I used the method of folding the paper in half so everything would be symmetrical
  • Mod Podge your owl on the board, add some eyeballs and you're done!

I love my little owl!


Sunday, November 25, 2012

Holiday Gift Idea: Home Made Laundry Detergent


With the holidays coming up, everyone is looking for gift ideas. The DIY craze has hit full force, and why wouldn't it? It's tough economic times, and the perfect opportunity for individuals to get creative. With this recipe for home made laundry detergent, you can make at least four gifts, all for under $20! There is room to make more than four, depending on how big your canning jars are. There is also room for this to cost less, depending on the brand of the ingredients purchased. Even for personal use, this recipe yields approximately 80 loads for $20. Sounds good to me!

This is a great idea for teachers, your postal worker, coaches or gift exchanges.  I haven't met a person who doesn't wash their clothes :)


Home Made Laundry Detergent {more bang for your buck}
2 Tablespoons per load, 20 loads per jar


Ingredients:

8 Cups Powder Detergent (All $7.00)
1.5 Cups Powder Stain Remover (Oxiclean $5.00)
1 Cup Fabric Softener Crystals (Downy Lush $6.00)
1/2 Cup of Baking Soda ($1.00)
2 Bars of Anti-Bacterial Soap ($2.00)

Supplies:

Canning Jars (I used 1 quart and made 4 jars full)
Cheese Grater
Mixing Bowl
Measuring Cup


** I made half of the recipe at a time in a large mixing bowl, it was definitely easier to manage.

Step 1:

Grate the soap. Using your cheese grater, grate the bar of soap into your mixing bowl.


Step 2: 

Add the powdered detergent, powdered stain lifer, baking soda and fabric softener crystals. Mix each ingredient as added with a large spoon.


Step 3:

Pour the mix in your canning jars. If you are using 1 quart like I did, just fill them to the top. If using a different size, you may want to measure that out in tablespoons.


To finish them off, stick a label on each jar. Make sure to include the instructions: 

2 Tablespoons = 1 load of laundry.

I hope your friends and family love this gift!


Saturday, November 24, 2012

DIY Holiday Wreath with Dollar Tree Items!


I have yet to meet a person who doesn't like the dollar store. I knew when I went there tonight I would be looking for supplies to make a wreath. I have seen countless wreaths on Pinterest and wanted to make one of my own. I surprisingly had a hard time finding what I needed, so I definitely got creative. Here's how I made my wreath, enjoy!

Materials:

From the Dollar Tree:

Splatter Screen
2 tubes of small ornaments
Silver spiral branches
Ribbon
Small Clipboard
Door Hanger for wreath

From my stash:

Green paint
Black Paint
Scrap tulle and lace from yard sales


The first thing I did was paint the clipboard on the back side. I used the green paint for this. 


Then I painted our name on the clipboard with the black paint. Another idea I had was to use letter stickers. 


I swore I have seen foam wreaths at the Dollar Tree before. So either they were out, or I'm just crazy. This is where I needed to improvise. I ended up buying a splatter screen from the cooking isle. 


I took some scissors and cut the center out, leaving about 2 inches around the edge. Regular Scissors worked fine for this. CAUTION: The wire is sharp! Be careful throughout the rest of the project.


To fill out the wreath, I used some tulle and lace I had stashed from yard sales. As you can see, the old tulle was only 25 cents.


To begin filling out the wreath, I cut the lace and tulle into strips about 2 inches wide and 8 inches long. There was no exact measuring going on here, but I know it helps to give an estimate. I tied the strips in knots all along the wreath body. 


I just kept cutting and tying until I thought it looked full enough.


Next I inserted the silver branches behind the knots I made with lace and tulle. I cut the branches down to right below the curl at the end. I left just enough room to insert the end of the branch and have the curl sticking out of the side. 


After that, I began to tie on the ornaments. The green ones were larger than the silver and gold, so I tied those on first and distributed them evenly. I cut about 6 inch pieces of ribbon, threaded them through the top of the ornament and tied them onto the wreath. I followed the same process with the smaller silver and gold ornaments.


To finish off the wreath, I wrapped the handle with lace and tied some tulle into a loop and bow through the handle. 

Then I tied ribbon through the back (really the front) aka non-colored side of the clipboard, using the clip as a hanger. I then tied that ribbon to the top of the wreath, so the clipboard hangs behind the wreath. Here is the finished product:


Here's what the wreath looks like on the door:


Overall, this was a really fun and easy project. Not to mention CHEAP! I only spent $7 at Dollar Tree. It's nice to have a wreath with a personal touch. 


Friday, October 26, 2012

Halloween Kid's Game! Guest Post at Glamorous, Affordable Life!


I absolutely loved to play this game at Halloween parties when I was younger. Truth be told, I still have a blast playing it with the kids I teach! Check out my tutorial for the game over at Glamorous, Affordable Life.

http://glamorousbride.blogspot.com/2012/10/guest-post-and-halloween-kids-craft.html

Wednesday, October 24, 2012

Guest Post: Kid Craft! Ghost Luminaries for Halloween

I am so happy to have Fotini as a guest blogger from  Glamorous, Affordable Life! I hope you all enjoy reading her writing as much as I do!


Hi! My name is Fotini and I blog over at Glamorous, Affordable Life! I’m thrilled to be guest posting today, thank you Michelle ;)


Today I’m going to be sharing a fun, easy craft project to do with the kids! Ghost luminaries…
Here’s what you’re going to need:
  • ·         Brown paper bags
  • ·         White craft or body paint, paintbrush
  • ·         Plastic plate (to put the paint on)
  • ·         Googly eyes
  • ·         Craft glue
  • ·         Decorative scissors (optional)
  • ·         Flameless candles


Grab your paper bag, paint, paintbrush and plastic plate.  Get your little ones bare tootsies out and begin to paint. My son is soo ticklish, he could barely stay still! Once the entire foot (toes included!) are covered in paint, place it firmly onto the bag (the heel should be towards the opening of the bag).


Repeat for your desired number of luminaries. I did two for each of my kids. Let your paint dry. I trimmed the top of my bags with decorative craft scissors, just for looks! Next, glue on your googly eyes. 


I was able to pick up two-packs of flameless candles at the dollar store, $1 per pack. Add your flameless candles to your bags and volia, ghost luminaries!


How cute would these look lined up your driveway for trick-or-treat night?!  I added mine to our hallway in front of the kids’ rooms. They look so cute lit up and the kids love them!


LinkWithin

Related Posts Plugin for WordPress, Blogger...